
Introduction
Chocolate éclairs, with their elegant shape and luxurious filling, are a quintessential French pastry that has captured the hearts of dessert lovers around the world. These delightful treats boast a delicate choux pastry shell filled with rich pastry cream and topped with a glossy layer of chocolate glaze. The combination of textures and flavors makes chocolate éclairs a beloved classic in French patisserie, often served at celebrations, weddings, and special occasions.
The history of éclairs can be traced back to the 19th century, where they were first introduced in France. The name “éclair” translates to “flash” in French, a nod to the pastry’s light and airy nature, which can be devoured in a matter of moments. Traditionally, éclairs were filled with coffee or chocolate-flavored pastry cream, but modern variations include an array of fillings from fruit to whipped cream. Despite the numerous adaptations, the classic chocolate éclair remains a staple, resonating with both the young and the seasoned connoisseur of pastries.
In this article, we will take you through a detailed journey of mastering chocolate éclairs at home. We will explore the fundamentals of choux pastry, gather our ingredients with a focus on quality, and guide you through the step-by-step process of creating these delectable treats. Whether you’re a beginner or a seasoned baker, this comprehensive guide will provide you with all the insights you need to create stunning chocolate éclairs that will impress your family and friends.
Understanding Choux Pastry
At the heart of every chocolate éclair lies choux pastry, also known as pâte à choux. This versatile pastry dough serves as the foundation for a variety of sweet and savory dishes, from cream puffs to gougères. The beauty of choux pastry lies in its simplicity and its ability to transform into a light, airy confection when baked correctly.
Definition and Characteristics of Choux Pastry
Choux pastry is unique in that it is made without any leavening agents like baking powder or yeast. Instead, it relies on the steam created from the high moisture content in the dough during baking to puff up and form its characteristic hollow interior. The result is a golden-brown shell that is crisp on the outside yet soft and airy on the inside, making it the perfect vessel for creamy fillings.
The basic components of choux pastry include water, butter, flour, and eggs. Each ingredient plays a crucial role in the texture and structure of the pastry. The water and butter create steam when heated, while the flour provides the necessary structure. Eggs are then added to create a rich, glossy dough that can hold its shape while baking.
The Science Behind Choux Pastry: Why It Puffs Up
Understanding the science behind choux pastry is essential for achieving the perfect éclair. When the dough is placed in a hot oven, the water content begins to evaporate, creating steam. This steam pushes against the structure of the pastry, causing it to expand and puff up. The fat from the butter also contributes to the overall texture, helping to create a tender crumb.
One key to successful choux pastry is ensuring that the dough is well-mixed and cooked before adding the eggs. This step allows the flour to fully hydrate and the mixture to achieve the proper consistency. If the dough is too wet, it may not hold its shape during baking; if it’s too dry, it may not puff up properly. Achieving the right balance is essential for crafting éclairs that rise beautifully.
Common Uses of Choux Pastry in French Cuisine
Choux pastry is not only limited to chocolate éclairs; it is a foundational element in many classic French desserts and savory dishes. Some popular uses include:
– Cream Puffs: Light and airy pastries filled with whipped cream or pastry cream.
– Profiteroles: Choux pastry balls often filled with ice cream and drizzled with chocolate sauce.
– Gougères: Savory choux puffs made with cheese, perfect for appetizers or snacks.
– Paris-Brest: A ring-shaped pastry filled with praline cream, celebrating the Paris-Roubaix bicycle race.
The versatility of choux pastry makes it a favorite among bakers and chefs alike, as it can be adapted to suit a variety of flavor profiles and occasions.
Gathering Your Ingredients
Before embarking on the journey of making delightful chocolate éclairs, it is essential to gather all your ingredients. The quality and freshness of the ingredients you choose can significantly impact the final outcome of your éclairs. Below, we break down the necessary ingredients for each component of the recipe.
Breakdown of Ingredients for Choux Pastry
– Water (1 cup): Essential for creating steam during baking, contributing to the puffiness of the pastry.
– Unsalted Butter (½ cup): Adds richness and flavor while also helping in the creation of steam.
– All-Purpose Flour (1 cup): Provides structure and stability to the pastry dough.
– Salt (1/4 teaspoon): Enhances the flavor of the pastry.
– Eggs (4 large): Vital for the dough’s structure, contributing to a rich texture and helping the pastry rise.
Breakdown of Ingredients for Pastry Cream
– Whole Milk (2 cups): Forms the base of the pastry cream, providing creaminess and flavor.
– Granulated Sugar (3/4 cup): Sweetens the pastry cream, balancing the richness.
– Egg Yolks (4 large): Enrich the cream and help in thickening.
– Cornstarch (1/4 cup): Acts as a thickening agent.
– Vanilla Extract (1 teaspoon): Adds a fragrant note to the cream.
– Unsalted Butter (2 tablespoons): Introduces richness and a smooth texture to the pastry cream.
Breakdown of Ingredients for Chocolate Glaze
– Semi-Sweet Chocolate (4 ounces): The main ingredient for the glaze, providing a rich chocolate flavor.
– Heavy Cream (1/2 cup): Used to melt the chocolate, creating a smooth and glossy finish.
– Butter (1 tablespoon): Enhances the shine and richness of the glaze.
Importance of Ingredient Quality in Pastry Making
When it comes to making pastries, the quality of your ingredients can make or break your final product. Fresh, high-quality ingredients not only enhance the flavor but also contribute to the texture and appearance of your éclairs. For instance, using real vanilla extract instead of imitation can elevate the flavor profile of your pastry cream, while fresh eggs yield a richer dough. By sourcing the best ingredients, you ensure that your chocolate éclairs taste as delightful as they look.
Step-by-Step Guide to Making Chocolate Éclairs
Now that you have a solid understanding of the ingredients and the science behind choux pastry, it’s time to dive into the step-by-step process of creating chocolate éclairs. This section will guide you through each stage of the recipe, from making the choux pastry to filling and glazing the éclairs.
Creating the Choux Pastry
1. Boiling the Butter and Water Mixture:
Begin by combining the water and unsalted butter in a medium saucepan. Place the saucepan over medium heat and bring the mixture to a gentle boil. Ensure that the butter is completely melted before moving to the next step.
2. Adding the Flour: Techniques for Success:
Once the butter and water mixture is boiling, remove the saucepan from the heat. Quickly add the all-purpose flour and salt to the mixture, stirring vigorously with a wooden spoon or spatula. The goal is to mix the flour into the liquid quickly and thoroughly. You should see the dough come together and form a ball, pulling away from the sides of the saucepan. This process typically takes about 1-2 minutes.
3. Incorporating Eggs: Achieving the Right Consistency:
Allow the dough to cool for a few minutes before adding the eggs. This prevents the eggs from cooking when they come in contact with the hot dough. Once slightly cooled, add the eggs one at a time, mixing well after each addition. The dough should become smooth and glossy. It is crucial to achieve the right consistency; the dough should be thick enough to hold its shape but thin enough to pipe easily.
4. Visual Indicators of Ready Choux Pastry:
You will know your choux pastry is ready when it forms a smooth, shiny surface and holds its shape when piped. A good test is to take a small amount of dough on a spatula and turn it upside down; if it forms a peak that stands upright without collapsing, your dough is ready for piping.
Piping the Éclairs
1. Selecting the Right Piping Tip and Bag:
For piping éclairs, a large round piping tip (such as a 1/2-inch tip) is ideal. This size allows for a generous amount of dough to flow through, creating the classic éclair shape. Place the piping bag fitted with the tip into a tall glass or jar to make filling it easier.
2. Techniques for Piping Perfect Éclair Shapes:
Fill the piping bag with the choux pastry dough, ensuring there are no air bubbles. To pipe, hold the piping bag at a 45-degree angle above the baking sheet lined with parchment paper. Begin by squeezing the bag gently, applying even pressure while moving your hand in a straight line to create a long, even shape. Aim for éclairs that are about 4 inches long. Release the pressure at the end to prevent the dough from trailing off.
3. Tips for Ensuring Even Size and Shape:
To create uniformly sized éclairs, you can use a ruler to measure the length of each éclair as you pipe them. Another tip is to use a template under the parchment paper to ensure consistency in size. After piping, use a wet finger to smooth any peaks or rough edges, which can help achieve an even bake.
With these foundational steps in place, you are well on your way to creating delightful chocolate éclairs that are sure to impress. In the following sections, we will delve deeper into making the pastry cream and chocolate glaze, ensuring your éclairs are not only beautiful but also delicious. Stay tuned as we continue this sweet journey into the world of French pastries!
Baking the Éclairs
Preheating the Oven: Importance of Temperature Control
The first step in baking perfect chocolate éclairs is to preheat your oven. Setting the temperature correctly is crucial for creating that airy, puffed-up texture that defines éclairs. A standard temperature for baking éclairs is around 400°F (200°C). Preheating ensures that the heat penetrates the dough evenly, allowing it to rise properly while maintaining its structure. If the oven isn’t adequately preheated, your éclairs may collapse or fail to rise, resulting in a dense pastry rather than the light, flaky treat you desire.
Baking Tips: Avoiding Collapses and Achieving Golden Perfection
To prevent your éclairs from collapsing, it’s essential to maintain a consistent temperature throughout the baking process. Here are some tips to achieve golden perfection:
1. Do Not Open the Oven Door: Once the éclairs are in the oven, resist the temptation to check on them until the baking time is nearly complete. Opening the door can cause a sudden drop in temperature, leading to a deflated pastry.
2. Use a Piping Bag: Pipe your éclairs onto a parchment-lined baking sheet with a steady hand, ensuring they are of equal size for even baking. This uniformity not only enhances the aesthetics but also promotes consistent baking.
3. Bake in Batches: If your oven cannot accommodate multiple trays at once, bake them in batches. This ensures that each tray receives the same amount of heat, allowing for uniform baking.
4. Rotate the Trays: Halfway through the baking time, rotate your baking sheets. This helps to counteract any hot spots in your oven and ensures that all éclairs are baked evenly.
Cooling Techniques to Maintain Structure
Once your éclairs are golden brown and puffed up, it’s time to remove them from the oven. To maintain their structure and prevent them from becoming soggy, follow these cooling techniques:
– Poke a Small Hole: Using a skewer or toothpick, gently poke a small hole in the side of each éclair. This allows steam to escape, preventing moisture buildup inside the pastry.
– Cool on a Wire Rack: Transfer the éclairs to a wire rack to cool completely. This will stop the cooking process and allow air to circulate around them, preventing sogginess.
Preparing the Pastry Cream
Heating Milk and Sugar: Key Points to Watch
To create the delicious pastry cream that fills your éclairs, start by heating the milk and sugar. Combine 2 cups of whole milk with half a cup of granulated sugar in a saucepan over medium heat. Stir occasionally to dissolve the sugar completely, and keep an eye on the mixture as it heats. The key point to watch for is just before it reaches a simmer—this is when you want to remove it from the heat to prevent scalding.
Combining Ingredients: Whisking Techniques for Smoothness
While the milk mixture cools slightly, whisk together 4 large egg yolks, 1/4 cup of cornstarch, and a pinch of salt in a separate bowl. The cornstarch is essential for thickening the cream, while the salt enhances the overall flavor. Gradually pour the warm milk mixture into the egg yolk mixture while whisking continuously. This tempered approach prevents the eggs from cooking too quickly and ensures a smooth, lump-free cream.
Thickening Process: Signs Your Cream is Ready
Return the combined mixture to the saucepan and cook over medium heat, whisking constantly. Watch for the cream to begin thickening; this usually takes about 5-7 minutes. You’ll know it’s ready when it coats the back of a spoon and holds its shape. If you notice any lumps forming, continue whisking vigorously to break them up. Once thickened, remove the cream from the heat and stir in a teaspoon of vanilla extract for added flavor.
Chilling the Cream: Why This Step is Crucial
After cooking, transfer the pastry cream to a bowl and cover it with plastic wrap, pressing it directly onto the surface to prevent a skin from forming. Chill in the refrigerator for at least 2 hours, or until completely cool. Chilling is a crucial step for achieving the right texture; it allows the flavors to meld and ensures that the cream is firm enough for filling the éclairs.
Assembling the Éclairs
Techniques for Creating the Perfect Slit
Once your éclairs are cool and your pastry cream is chilled, it’s time to assemble the éclairs. Start by creating a perfect slit for filling. Use a sharp knife to cut a small opening on the side of each éclair, about halfway down. The slit should be long enough to allow the filling but not so large that the cream spills out. This technique helps maintain the integrity of the éclair while allowing for adequate filling.
Tips for Filling Éclairs: Avoiding Overfilling or Underfilling
To fill your éclairs, use a piping bag fitted with a long nozzle. Insert the tip into the slit and gently squeeze to fill the éclair with pastry cream. Avoid overfilling, as this can cause the éclairs to burst or become soggy. A good rule of thumb is to fill them just until you feel slight resistance. If you prefer a more decadent treat, you can also drizzle some chocolate glaze over the top after filling.
Making the Chocolate Glaze
Melting Chocolate and Butter: Best Practices
For the chocolate glaze, start by chopping 4 ounces of high-quality bittersweet chocolate and placing it in a heatproof bowl. Add 2 tablespoons of unsalted butter to the chocolate, which will give the glaze a beautiful shine. Melt the chocolate and butter together over a double boiler, stirring occasionally until smooth and silky. Alternatively, you can melt them in the microwave in short bursts of 15 seconds, stirring in between to avoid burning.
Achieving the Right Consistency for a Glossy Finish
Once melted, let the chocolate mixture cool slightly. The ideal consistency for glazing should be thick enough to cling to the éclairs but pourable enough to spread easily. If it’s too thick, you can add a teaspoon of vegetable oil to achieve a glossy finish.
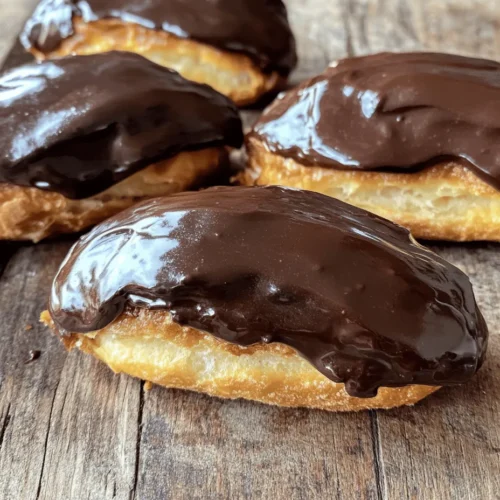
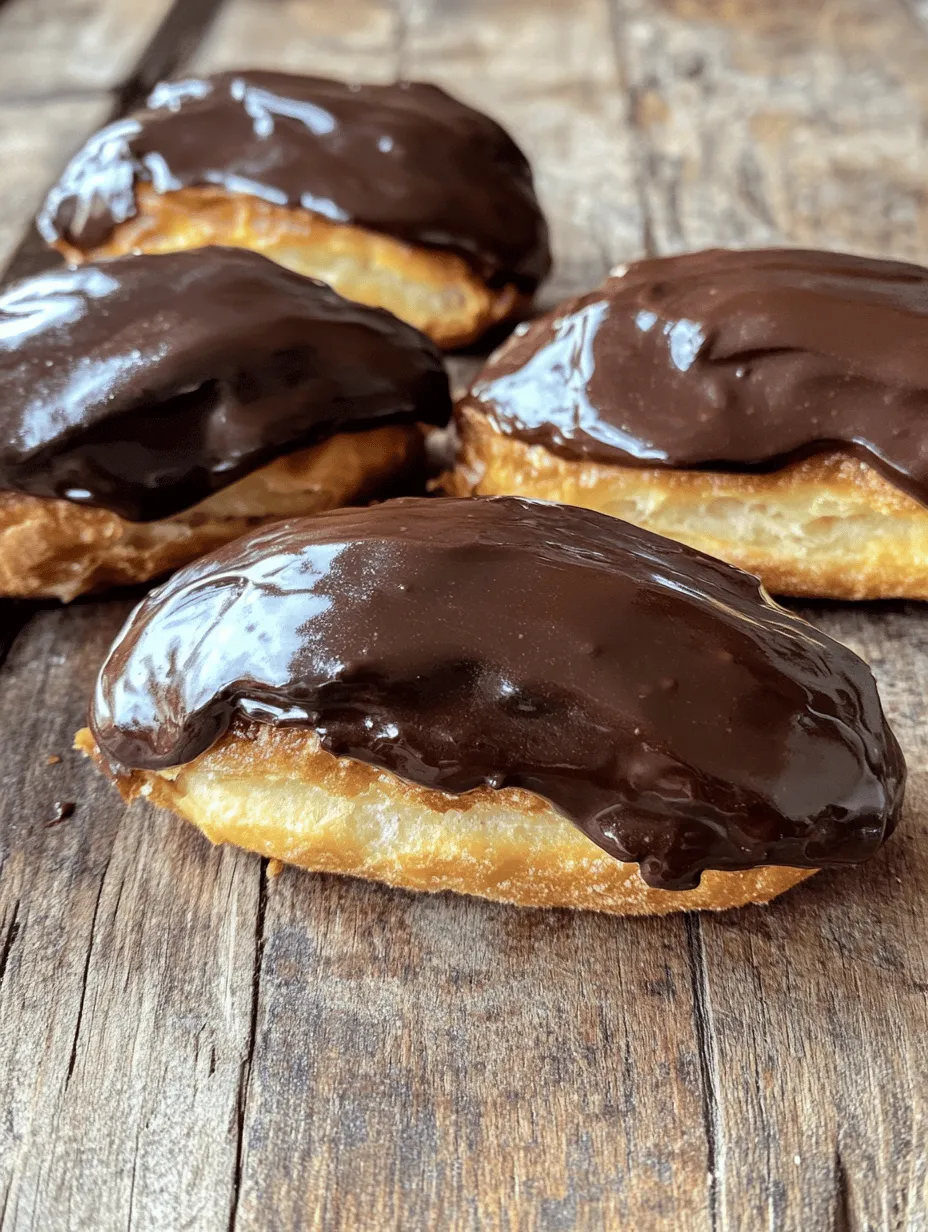
Glazing the Éclairs
Techniques for Dipping vs. Drizzling
When it comes to glazing your éclairs, you have two primary options: dipping or drizzling. For a clean and elegant look, dip the top of each éclair into the chocolate glaze, ensuring an even coating. Allow any excess glaze to drip off before placing them back on the wire rack.
If you prefer a drizzled effect, use a spoon to drizzle the glaze over the top of each éclair. This method creates a delightful visual and adds an artistic touch to your pastries.
Allowing the Glaze to Set: Timing Considerations
After glazing, allow the chocolate to set at room temperature for about 15-30 minutes. This ensures that the glaze hardens slightly, making for a beautiful presentation while keeping the éclairs’ filling intact.
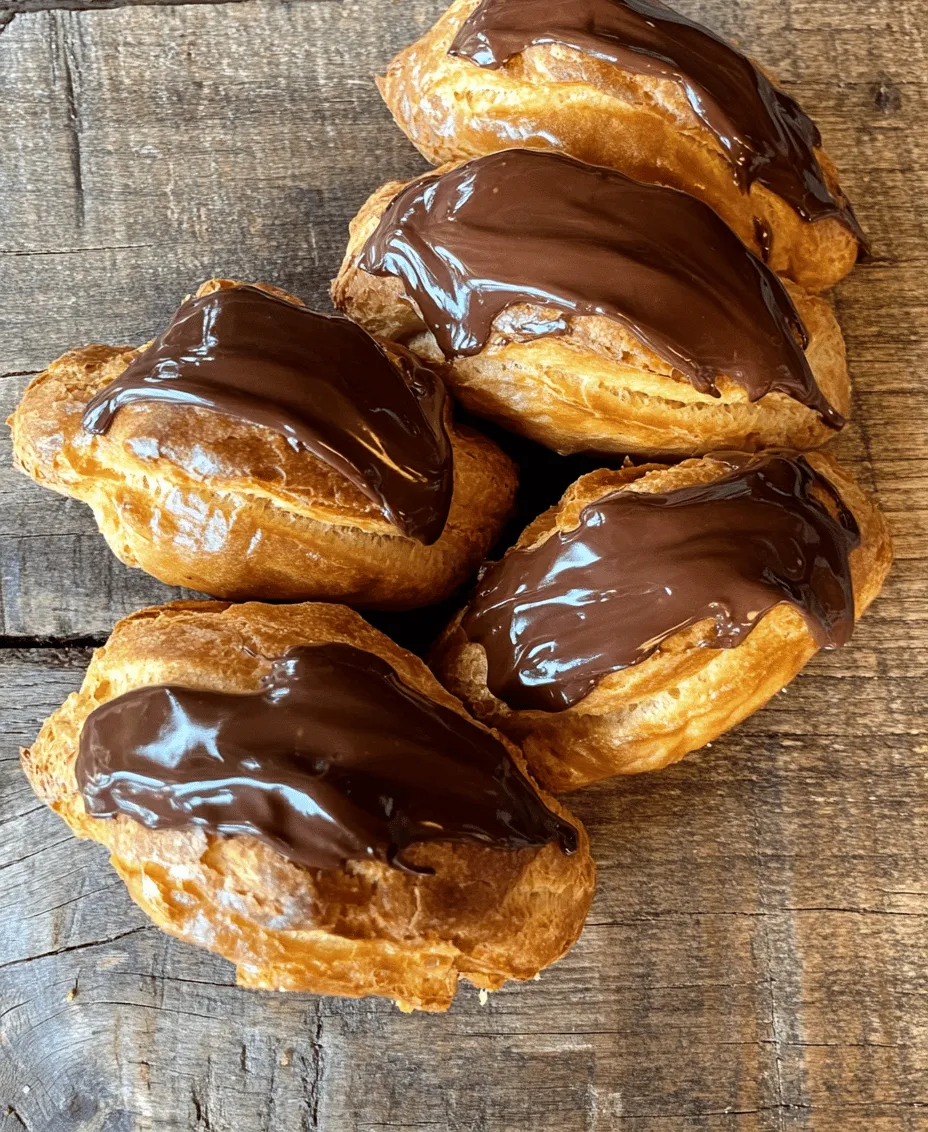
Serving and Enjoying Your Éclairs
Presentation Tips for Displaying Éclairs
Presentation is key when serving your delightful chocolate éclairs. Arrange them on a decorative platter, and consider dusting them with powdered sugar or cocoa powder for an added touch of elegance. You can also use fresh berries or mint leaves to garnish the platter, enhancing the visual appeal of your homemade treats.
Pairing Suggestions: Beverages that Complement Éclairs
To elevate your chocolate éclair experience, consider pairing them with a selection of beverages. A rich cup of coffee or espresso pairs beautifully with the sweetness of the éclairs, complementing the flavors perfectly. For a lighter option, serve with a refreshing cup of tea, such as Earl Grey or a floral herbal blend. If you prefer something more indulgent, a glass of dessert wine or a creamy hot chocolate can make for a decadent treat.
The Joy of Homemade Éclairs
Making chocolate éclairs from scratch is not just about the final product; it’s about the joy of the process. There’s a unique satisfaction that comes from mastering a classic pastry, celebrating the skills you’ve acquired along the way. The contrast of the airy choux pastry with the rich, creamy filling and glossy chocolate glaze is a testament to your culinary artistry.
Homemade éclairs offer a flavor and texture that store-bought versions simply cannot match. The freshness of the ingredients and the care you take in preparation enhance each bite, creating a memorable experience that will impress family and friends alike. Sharing these éclairs with loved ones will surely bring joy, sparking conversations and creating lasting memories.
Conclusion
In summary, creating delightful chocolate éclairs is a rewarding journey that showcases the beauty of baking. From the careful preparation of the choux pastry to the delicate crafting of the pastry cream and the glossy chocolate glaze, each step is essential in achieving the perfect éclair. By mastering this classic recipe, you not only elevate your baking skills but also gain a sense of accomplishment that comes from creating something truly special.
Embrace the process, enjoy the fruits of your labor, and celebrate the artistry of baking with your homemade chocolate éclairs. Whether you serve them at a gathering, enjoy them with a cup of coffee, or indulge in a quiet moment of self-care, these delectable pastries are sure to bring happiness to any occasion.