
Introduction
If you’re looking for a dessert that perfectly balances creamy indulgence with the sweet, summery flavor of fresh fruit, look no further than Delightful Peaches and Cream Cheesecake Bars. This delectable recipe combines the rich, velvety texture of cheesecake with the juicy sweetness of ripe peaches, resulting in a treat that is both refreshing and satisfying. The beauty of cheesecake bars lies in their versatility; they are easy to serve, making them an ideal choice for a variety of occasions. Whether you’re hosting a summer barbecue, celebrating a special milestone, or simply indulging in a well-deserved treat, these cheesecake bars promise to impress.
The allure of this recipe extends beyond its taste. The vibrant colors and luscious textures make it visually appealing, while the combination of flavors creates a harmonious dessert experience. As you explore the flavors and textures in these Delightful Peaches and Cream Cheesecake Bars, you’ll discover why they are a must-try for cheesecake lovers and fruit enthusiasts alike.
Understanding the Ingredients
To create the perfect peaches and cream cheesecake bars, it is crucial to understand the role of each ingredient in the recipe. This will not only help you appreciate the flavors but also enable you to achieve the best possible results.
Key Ingredients Overview
1. Graham Cracker Crumbs: The crust of the cheesecake bars is made from graham cracker crumbs, which provide a sweet and slightly nutty flavor. This crumbly base is essential for creating a stable foundation that complements the creamy filling. The texture of the crust is key; it should be firm enough to hold the bars together while also being tender enough to provide a delightful crunch.
2. Cream Cheese: The star of the cheesecake filling, cream cheese contributes to the rich, creamy texture that we all adore in cheesecakes. It is important to use high-quality cream cheese that is full-fat to achieve that luxurious mouthfeel. Softening the cream cheese before mixing is essential, as it ensures a smooth and lump-free filling.
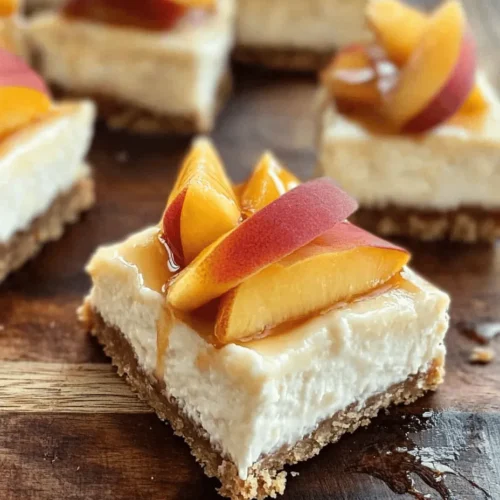
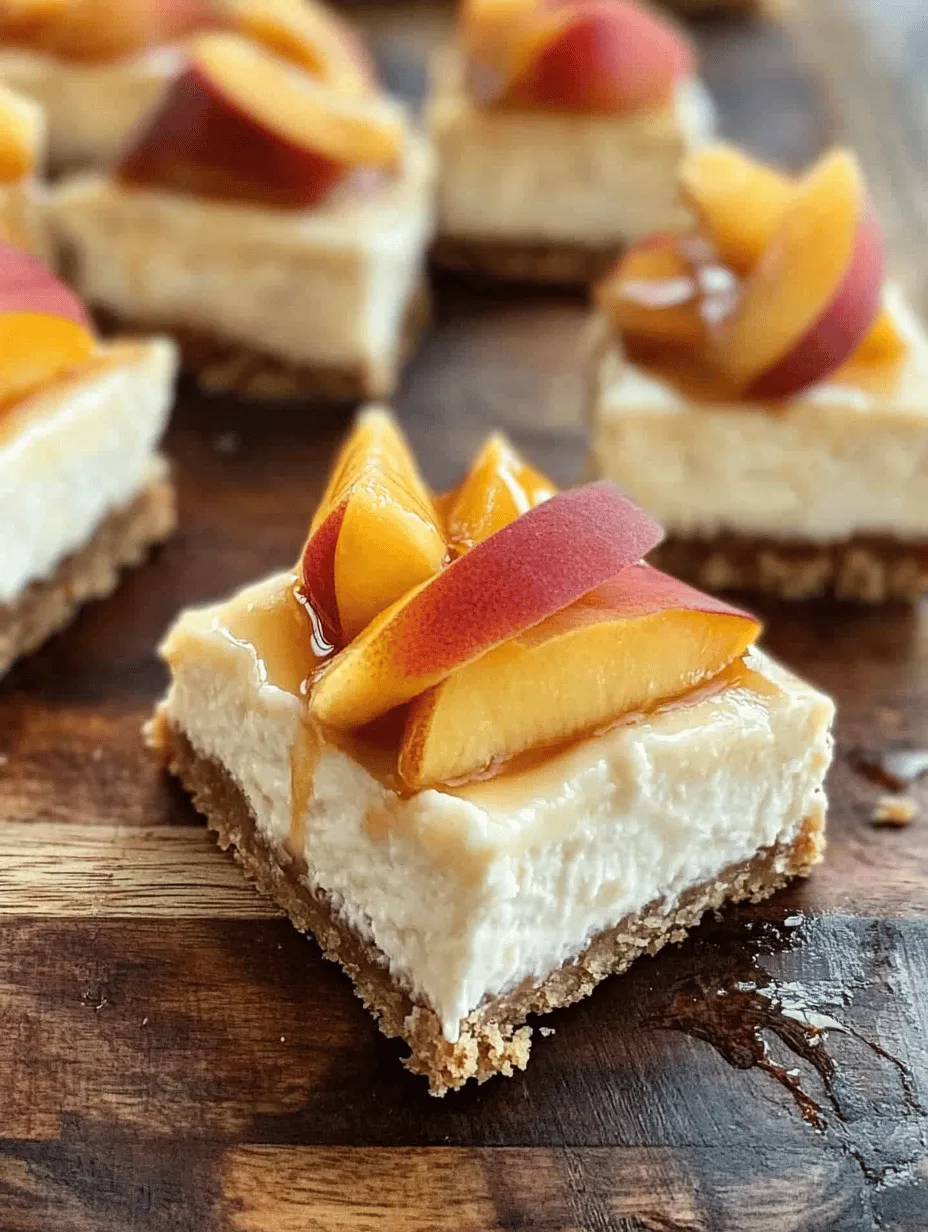
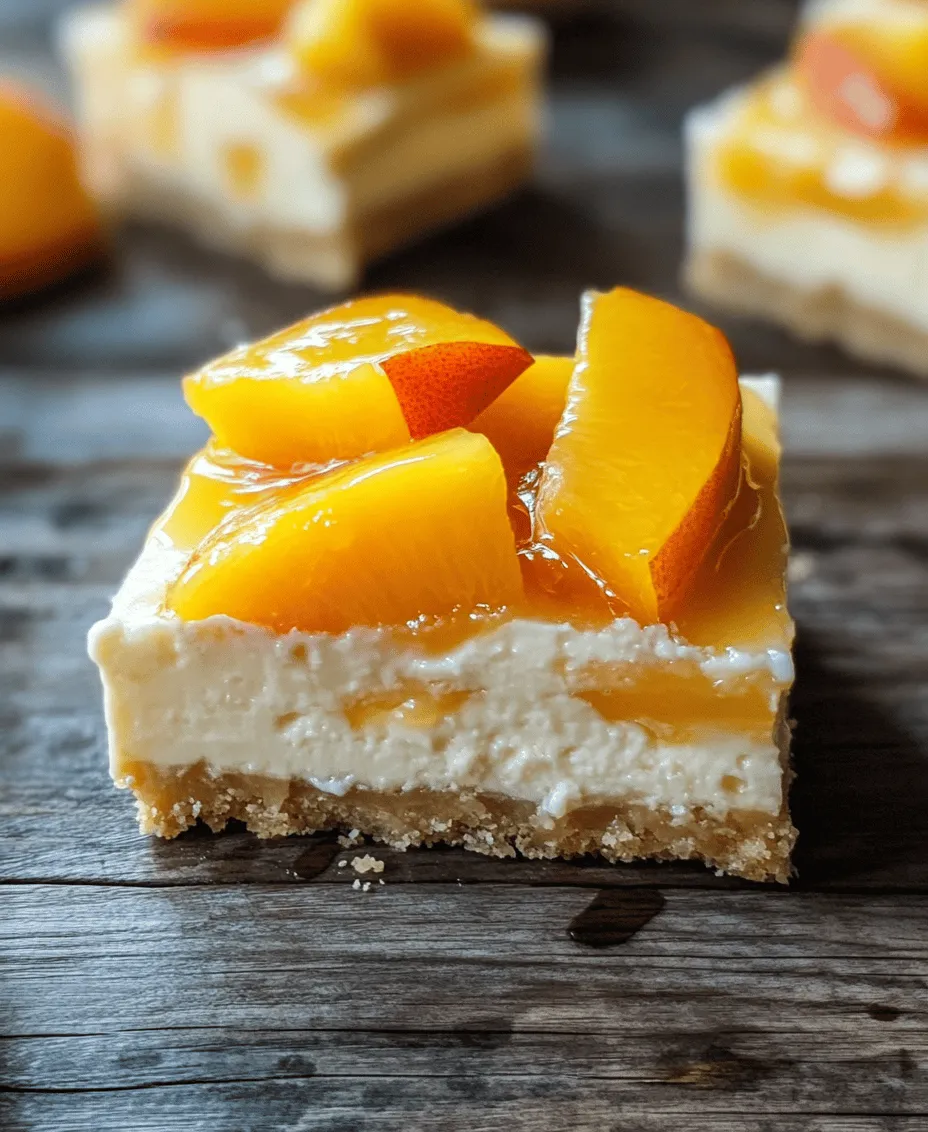
3. Fresh Peaches: The addition of fresh peaches not only enhances the flavor profile but also adds a beautiful pop of color to the dessert. Ripe peaches bring a natural sweetness and juiciness that pairs wonderfully with the cream cheese filling, creating a refreshing contrast to the richness of the cheesecake.
4. Sugar: To balance the flavors, granulated sugar is added to both the crust and the filling. The sugar helps to enhance the sweetness of the peaches and contributes to the overall taste of the cheesecake.
5. Eggs: Eggs play a crucial role in binding the filling together and providing structure. They help to create the creamy consistency that is characteristic of cheesecake, allowing it to set properly during the baking process.
6. Vanilla Extract: A splash of vanilla extract elevates the flavor of the cheesecake filling, adding depth and warmth to the overall taste experience.
Sourcing Fresh Ingredients
For the best results, sourcing high-quality, fresh ingredients is essential. When it comes to peaches, look for ripe, fragrant fruits that are slightly soft to the touch. Local farmers’ markets or grocery stores that prioritize seasonal produce are often the best places to find fresh peaches. If possible, choose organic peaches to avoid pesticides and ensure that you are using the best quality fruit. For the cream cheese, opt for a reputable brand that offers a full-fat version, as this will significantly impact the texture and flavor of your cheesecake bars.
Creating the Perfect Crust
The crust is the foundation of your peaches and cream cheesecake bars, and taking the time to make it right is crucial. Here’s a detailed guide on how to prepare the graham cracker crust, ensuring it is both delicious and stable.
Instructions for Making the Crust
1. Gather Your Ingredients: You will need graham cracker crumbs, granulated sugar, and unsalted butter. The butter should be melted to bind the crumbs together effectively.
2. Mix the Ingredients: In a medium mixing bowl, combine 1 ½ cups of graham cracker crumbs with ¼ cup of granulated sugar. Stir the mixture until evenly combined. Next, pour in ½ cup of melted unsalted butter and mix until the crumbs are fully coated and the mixture resembles wet sand.
3. Press the Crust: Transfer the crumb mixture into a greased 9×9-inch baking pan (or a similar size) and use the back of a measuring cup or your fingers to press the crumbs firmly and evenly across the bottom of the pan. This step is vital; a well-pressed crust will hold together nicely once baked.
4. Bake the Crust: Preheat your oven to 350°F (175°C). Place the crust in the preheated oven and bake for about 8-10 minutes, or until it is slightly golden and fragrant. Be careful not to over-bake, as the crust can become too hard.
5. Cool the Crust: After baking, remove the crust from the oven and allow it to cool while you prepare the cheesecake filling. This cooling process helps to keep the crust firm while you add the creamy layer on top.
Tips for Perfecting the Crust
– Texture and Firmness: The crust should be firm but not overly hard. If you find that your crust is too crumbly, you may need to add a bit more melted butter to the mixture.
– Even Pressing: Ensure that you press the crust evenly across the bottom of the pan. This will prevent uneven baking and help the crust maintain its structure once the cheesecake filling is added.
– Variations: While graham cracker crumbs are a classic choice, you can experiment with different cookie crumbs for a unique twist. Consider using crushed Oreo cookies, vanilla wafers, or even nut-based crusts for a gluten-free option.
With your crust perfectly prepared and cooled, you’re ready to move on to the next exciting phase of making these delightful cheesecake bars.
Crafting the Creamy Cheesecake Filling
Now that you have your graham cracker crust ready, it’s time to create the luscious cheesecake filling that will elevate your bars to a whole new level. Follow this step-by-step guide to ensure a smooth, creamy filling that pairs beautifully with the fresh peaches.
Step-by-Step Guide to Preparing the Filling
1. Soften the Cream Cheese: Start by taking your cream cheese out of the refrigerator and allowing it to soften at room temperature for about 30 minutes. Softened cream cheese is key to achieving a smooth and creamy filling without lumps.
2. Mix the Cream Cheese and Sugar: In a large mixing bowl, add 16 ounces of softened cream cheese along with ¾ cup of granulated sugar. Using an electric mixer, beat the mixture on medium speed until it is smooth and creamy, about 2-3 minutes. Scrape down the sides of the bowl as needed to ensure even mixing.
3. Add Eggs and Vanilla: Once the cream cheese mixture is smooth, add in 2 large eggs, one at a time, mixing well after each addition. Then, add 1 teaspoon of vanilla extract and continue to mix until everything is well combined.
4. Incorporate the Peaches: Gently fold in 1 cup of diced fresh peaches using a spatula or wooden spoon. Be careful not to overmix; you want to maintain the integrity of the peach pieces for a delightful burst of flavor in each bite.
5. Final Consistency Check: The cheesecake filling should be thick, smooth, and creamy. If the mixture appears too thick, you can add a tablespoon or two of sour cream for extra creaminess and tanginess.
Importance of Texture
The texture of your cheesecake filling is crucial for achieving the perfect bars. A smooth, creamy mixture will set beautifully in the oven, while any lumps can affect the overall mouthfeel of the dessert. Remember to take your time during this step to ensure a velvety consistency.
As you prepare the filling, it’s essential to keep in mind that the flavor will continue to develop as it bakes alongside the crust. The sweetness of the peaches will infuse the cheesecake filling, creating a beautifully balanced dessert.
With your crust prepared and your creamy cheesecake filling ready to go, you are just a step away from baking these delightful bars. Keep an eye on the baking time to ensure that your cheesecake bars come out perfectly set and ready to be enjoyed.
The Cooling Process: Why It Matters for Texture and Flavor Development
After baking your peaches and cream cheesecake bars, the cooling process is crucial for achieving the perfect texture and flavor. Allowing the bars to cool gradually helps set the cheesecake filling, making it firmer and easier to slice. If you skip this step or rush it, you risk ending up with a soggy texture or cracks in your cheesecake.
To cool your bars effectively, first, let them sit at room temperature for about 30 minutes before transferring them to the refrigerator. This gradual cooling helps prevent sudden temperature changes that can lead to cracks. Once at room temperature, cover the pan with plastic wrap or aluminum foil to keep moisture in and place it in the fridge for at least four hours, or ideally overnight. This chilling time allows the flavors to meld beautifully, resulting in a luscious dessert that’s bursting with peach goodness.
Tips for Avoiding Common Baking Pitfalls
Baking is as much about technique as it is about ingredients. Here are some key tips to avoid common pitfalls when making your cheesecake bars:
1. Preventing Cracks: To minimize the risk of cracks on the surface of your cheesecake, ensure that your cream cheese is at room temperature before mixing. Also, avoid overmixing the batter once the eggs are added, as this can incorporate too much air, leading to cracks during baking.
2. Water Bath Method: For an extra level of assurance against cracking, consider using a water bath. Wrap the bottom of your springform pan in aluminum foil to prevent leaks, and place it in a larger pan filled with hot water. This method helps maintain a steady temperature, resulting in a smoother, creamier texture.
3. Testing for Doneness: The cheesecake is done when the edges are set, but the center still has a slight jiggle. It’s important not to overbake, as this can lead to a dry texture.
Preparing the Peach Topping
The peach topping is where the magic happens in this recipe. Here’s how to prepare it to perfection:
1. Gather Your Ingredients: You will need fresh peaches, sugar, lemon juice, and cornstarch. Start by washing, peeling, and slicing your peaches into thin pieces.
2. Cooking the Peaches: In a medium saucepan, combine the sliced peaches with sugar and lemon juice. The sugar not only sweetens the topping but also draws out the natural juices from the peaches, enhancing their flavor. Cook over medium heat for about 5-7 minutes until the peaches begin to soften.
3. Thickening with Cornstarch: To achieve the right consistency for your topping, mix a tablespoon of cornstarch with a few tablespoons of water in a small bowl to create a slurry. Stir this mixture into the peach mixture and cook for an additional 2-3 minutes until it thickens. This step is crucial; it prevents the topping from becoming too runny when poured over the cheesecake bars.
4. Alternative Toppings: If you want to get creative, consider adding other fruits like berries or even a sprinkle of cinnamon for warmth. You can also replace the peach topping with a berry compote or a caramel drizzle for a different flavor profile.
Assembling and Chilling the Bars
Once your cheesecake filling and peach topping are prepared, it’s time to assemble:
1. Layering the Cheesecake: Start by pouring the cooled cheesecake filling evenly over the crust in the pan. Use a spatula to smooth the top for an even layer.
2. Adding the Peach Topping: Spoon the peach topping over the cheesecake layer, being careful to spread it evenly. Use the back of the spoon to gently nudge the topping to the edges of the pan, ensuring every bite has a hint of peach.
3. Chilling Time: Cover the assembled bars with plastic wrap and return them to the refrigerator for at least 4 hours, or overnight if time allows. This chilling time is essential; it allows the flavors to develop and the cheesecake to firm up.
4. Presentation Techniques: When ready to serve, use a sharp knife dipped in hot water to cut clean slices. Wipe the knife between cuts for the best presentation. Consider garnishing each slice with a sprig of mint or a dollop of whipped cream for an extra touch.
Serving Suggestions and Pairing Ideas
Your peaches and cream cheesecake bars deserve the perfect setting. Here are some serving suggestions:
– Garnishing for Visual Appeal: A sprinkle of powdered sugar or a drizzle of honey can elevate the aesthetic of your dessert. Fresh peach slices or mint leaves can brighten up the plate and add a pop of color.
– Beverage Pairings: Pair these cheesecake bars with a glass of iced tea, lemonade, or a light sparkling wine. The refreshing flavors will complement the sweetness of the peaches beautifully.
– Occasions for Serving: These cheesecake bars are perfect for summer picnics, birthday parties, or family gatherings. They are also a delightful treat to bring to potlucks, where they’re sure to be a hit.
Nutritional Information
Understanding the nutritional profile of your dessert can help with mindful eating:
– Nutritional Overview: Each bar is a delightful balance of sweetness and creaminess, with a rich source of vitamins from the peaches. On average, a serving may contain around 250-300 calories, with a good amount of fat and carbohydrates.
– Portion Control: To enjoy these bars mindfully, consider cutting them into smaller squares. This way, you can savor the flavors without overindulging.
– Healthier Alternatives: If you’re looking to lighten the recipe, consider using lighter cream cheese or a sugar substitute like stevia or erythritol. You can also use whole wheat flour for the crust for added fiber.
Conclusion
The delightful flavors and textures of peaches and cream cheesecake bars are sure to impress anyone lucky enough to taste them. The combination of the creamy cheesecake with the sweet, tangy peach topping creates a dessert that is more than just a treat; it’s a celebration of summer flavors.
We encourage you to try this recipe and experience the joy of homemade desserts. Whether you’re baking for a special occasion or simply indulging yourself, these cheesecake bars are a perfect way to share love and creativity with family and friends. Cooking is not just about nourishment; it’s about creating memories and enjoying the simple pleasure of good food. So gather your ingredients, embrace your inner baker, and dive into this delightful recipe today!